I was recently part of a short conversation on Twitter about how great it would be if Reaper had the AudioSuite functionality of Pro Tools. The feature we were specifically after was the ability to have multiple plugins open at the same time, and to render them to any media item you’d like, in any order that you would like. After going back and forth about applying FX to media items, or copying over FX chains, we came to the conclusion that there was no native way to accomplish this. This was largely because in Reaper, you cannot have a free-standing effect/plugin window–the plugin either has to be assigned to a track or a media item.
But then I started thinking….what if you COULD copy any effect that you would like from a track, and apply it to any media item you want? That would be pretty cool! I saw no reason why this couldn’t be done, so I started to dive into the scripting capabilities of Reaper. For those interested, I used the Lua scripting language.
What I came up with was a script that would allow you to render any effect window that is open (of your choosing) to any media item of your choosing. I made two different scripts- one for stereo renders, and one for mono renders. I thought it was important to have the options, because in sound design, sometimes you need to make decisions like this.
Please note that there is no way to preview this plugins before you apply them. More on that later (or just press Ctrl+F: preview).
Also later: how you can add the scripts to Reaper, so you can have these features!
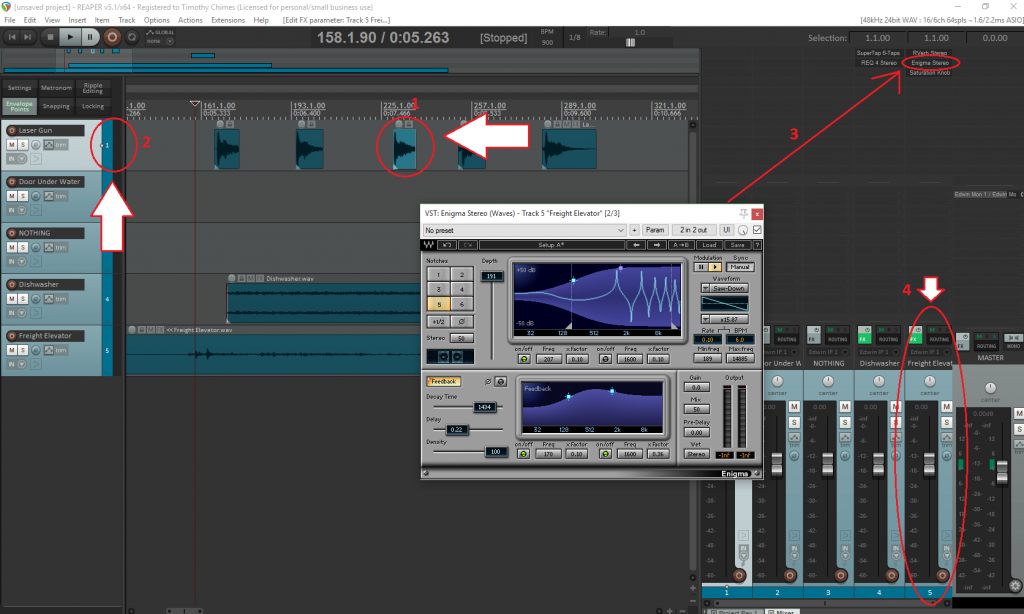
Say you have a session where you have multiple items on one track, but only want to apply a modulation effect to one item (the modulation effect is on a different track!). This can get confusing, so here’s a picture:
In the above picture, we can see 4 different things that are important:
1: We have a media item selected
2: The selected media source is on Track 1
3: We have an effect window open (specifically Enigma from Waves. Note: in Reaper, it does not matter that this is a Stereo plugin)
4: Our chosen effect is on Track 5
All you have to do now is press the shortcut key you assigned to the MONO version of the script, and you’re done! Here’s a before and after:
You should notice two things here. One is the change in wave form. If you listen back, you can hear that the modulation effect has been successfully applied!
The other thing is the new name of the media item. This script will add the name of the last plugin used to the end of the media item. This way, you can always tell which plugin you last applied to the media item.
The same process works for stereo media items. Just use the shortcut for the STEREO version of the script!
Oh wait, but what if you have an effect that has a long tail, like a reverb or a delay? Yes, that could be a problem, because Reaper doesn’t account for this tail when you render the media item with the new plugin. Fear not, for we can select how far we want this tail to go!
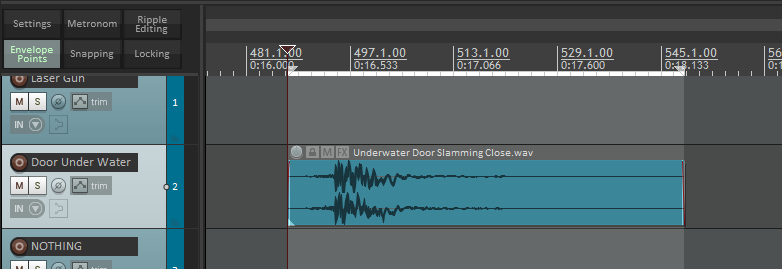
Make sure that the beginning of the selection is at the beginning of the media item. In fact, that easiest way to do this is to select the media item, and then press Shift + Double Click (I believe that is a default command). The selection should be the exact length of the media item. Like this:
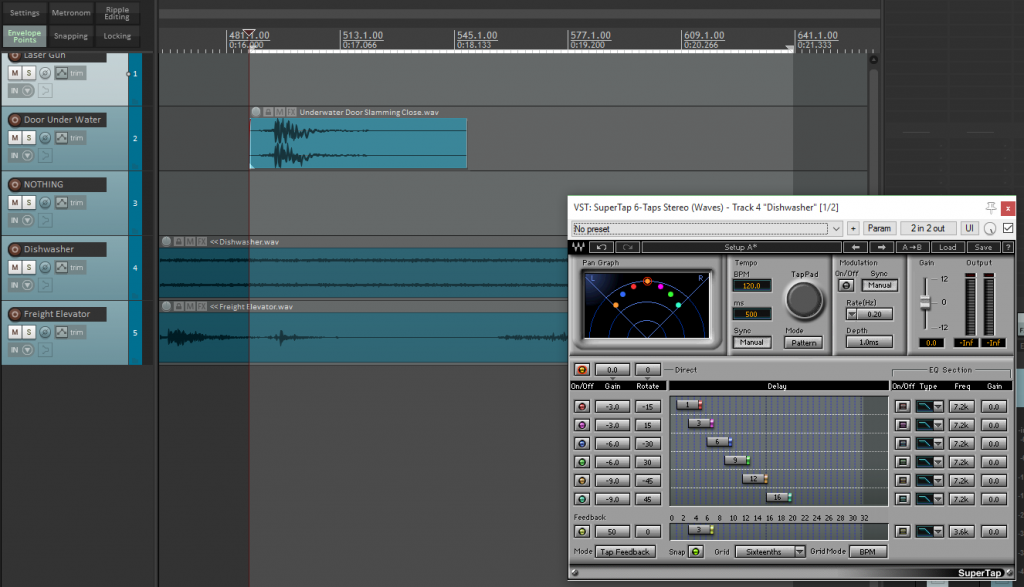
Then simply extend the end of the selection until you think you’ve made enough room for the tail. It’s always better to over-estimate this, because you can cut it later. Though if you make it too short, simply press undo, extend the selection, and then apply the effect again. No problem! Here’s an example of what I mean when you should extend the end point of the selection:
Note: I chose the Waves SuperTap for this example. Remember how the name of the FX is applied to the rendered media item?
Once you have the desired length of the selection, press the shortcut key for the script (I did the STEREO version in this example, but the choice is yours), and you should see the following:
The plugin has been rendered to the media item, including the tail from the feedback of the delay, and the name of the plugin (SuperTap 6-Taps) has been added to the end of the media item name.
There is no limit to how much these plugins can be stacked, or in what order. But beware, this is a destructive process. I believe that is the beauty of this script, as it makes you commit to a decision, but if you are used to non-destructive editing, beware. Like any action in Reaper, you can undo this, but if you open a session later and decided that you want to undo the EQ that you applied to a media item 3 days ago, you will be out of luck.
Although I prefer the destructive method, I also have a version of the script that is nondestructive. This nondestructive version simply make a new take every time a plugin is applied to the media item.
You might be wondering how you’re supposed to be able to preview these FX before you render them. Well, you can’t. I haven’t been able to figure that one out. There are a couple ways you can probably get around this using Reaper, but to be perfectly honest, just try rendering the plugin the media item, and if you don’t like it, undo it! The process is fairly quick, and since these are all shortcuts (well, as long as you use Ctrl + Z to undo), you can easily render the plugin, and undo it if you want to change the setting. It takes about as much time as constantly pressing a “preview” button anyway.
Downloading the scripts
Adding these scripts to Reaper is easy. First, download them here:
- DESTRUCTIVE Mono: http://timchimes.com/files/ReaScripts/AudioSweet%20Mono.lua
- DESTRUCTIVE Stereo: http://timchimes.com/files/ReaScripts/AudioSweet%20Stereo.lua
- NONDESTRUCTIVE Mono: http://timchimes.com/files/ReaScripts/AudioSweet_Nondestructive%20Mono.lua
- NONDESTRUCTIVE Stereo: http://timchimes.com/files/ReaScripts/AudioSweet_Nondestructive%20Stereo.lua
- Then open up Reaper and click Options > Show REAPER resource path in explorer/finder
- Open up the Scripts folder, and copy both scripts into this folder
- Go back to Reaper, and click Actions > Show Action List
- On the bottom of the Actions window, you will see a section labeled ReaScript. Click on Load
- Select both scripts by Ctrl + Clicking (or you can add them separately. I’m not your boss), and then click Open
- The Action list should highlight the script you just added (if it didn’t, search for script). The actions will be called Script: AudioSweet Mono.lua and Script: AudioSweet Stereo.lua
- Assign shortcut keys for both scripts!
For what it’s worth, I assigned my shortcut keys as follows:
Mono: Alt + Ctrl + Shift + 1
Stereo: Alt + Ctrl + Shift + 2
Unless you are using these key combinations already, I would recommend this configuration, because:
- It’s easy to do with one hand
- They’re complicated enough that you won’t press them by accident
- The obvious 1 for mono, and 2 for stereo
- It’s super close the Ctrl + Z for undo, so you can render and then undo at the speed of light if you didn’t like the settings you just applied!
To recap, here is what this script accomplishes:
- With a media item selected, and a plugin window open and selected, you can apply a mono or stereo version of the plugin to the selected media file
- The name of the last plugin that is applied is added to the name of the media item
- If you need to add a tail from a reverb or delay, make sure the media item is within a time selection, and then extend the end point
- You can use this with multiple plugin windows open, but only the highlighted plugin will be applied
- You must have only ONE media item selected.
- You must have a plugin window OPEN
- If you want to use a time selection, then the start of the selection MUST be at the start of the media item. This is why I suggested Shift + Double Click. If the start of the selection is not equal to the start of the media item, the time selection will be ignored


